Some Useful Guidelines For the Rigger
On the following pages are some useful tips to help the rigger do his job more efficiently and safely. Prevailing work rules and government regulations place full responsibility for proper performance upon the rigger, so it is his duty to be familiar with the condition and capability of all tools and equipment used, as well as techniques employed. One basic rule always applies: Always know…never guess.

Each lift may be divided into three parts, providing a convenient plan for proceeding:
1. The Lifting Device—Know its capability and limitations, and its condition. When was it last inspected? If in doubt about capacity, check the placard.
2. The Hitch—Here is where the rigger can exercise ingenuity…but it’s also the easiest place to make a mistake.
3. The Load—The weight must be known. But you must also protect the load from possible damage by the slings…and protect the slings from damage by the load.
Is the lifting device adequate?
Check the placard on the crane or hoist, and then answer three questions:
1. Is capacity adequate for this lift?
2. Will it lift high enough?
3. Is horizontal reach adequate?
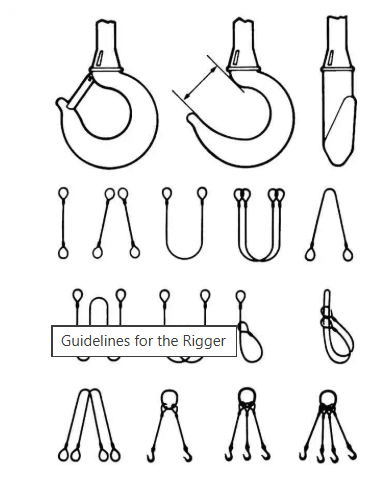
Check the hook and reeving.
1. Are sheaves properly rigged? If multi-part reeving, will it support the load?
2. Is the hook the right size so sling eye won’t be distorted when put over the hook?
3. Check for cracks in bowl of the hook, and for evidence of point loading or bending to one side of 15% or more.
Type of Hitch Determines Choice of Sling
Before you select a sling for a specific lift, determine the most effective hitch to do the job, protect the load, and protect the sling. One of three basic hitches will usually do the job.
The type of hitch you select may determine the type of sling body that will best do the job, as well as the length of sling that will be needed. Lifting height, overhead clearance and hook travel will affect choice of hitch and length of sling.
Choose a sling body type which will best support the load while providing adequate rated capacity. The proper choice will provide:
1. Lifting capacity needed.
2. Proper D/d Ratio.
3. Handling characteristics needed for rigging.
4. Minimal damage to the sling.
5. Minimal damage to the load.
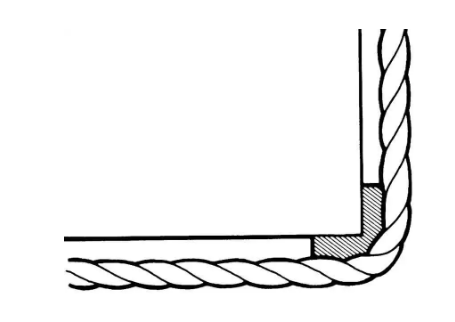
Protect the sling during the lift with blocking or padding at sharp corners or where the sling body would be bent severely.
Use a spreader bar between legs of a sling to prevent excessive side pressure on the load by the sling during the lift.
When attaching a sling to eye bolts, always pull on line with the bolt axis. When hitching to bolts screwed into or attached to a load, a side pull may break the bolts.
Use a shackle in the sling eye during a choke to protect sling body against excessive distortion. Always put shackle pin through sling eye, rather than against the sling body—since sliding movement of sling body could rotate pin, causing it to come loose.
A sliding hook choker is superior to a shackle or unprotected eye, since it provides a greater bending radius for the sling body.
Use blocking or padding to protect hollow vessels, loose bundles and fragile items from scuffing and bending. Remember that blocking becomes part of the lift, and must be added to total weight on the sling.
When lifting crates or wooden boxes with a basket hitch, be sure load can withstand side pressure as tension is applied to sling. Use spreader bars and corner protectors to prevent damage to contents.
When lifting a bundled load with a single sling near the center of gravity, a choke is more effective than a basket hitch to prevent unbalance and slipping of the load in the sling.
Some riggers will use a double wrap around the load, for 360° gripping of the load, to prevent slippage during the lift.
You can reduce the angle of a choke with a wooden block, or blocks, between the hitch and the load. This also increases the angle between the two legs to improve sling efficiency.
When rigging two or more straight slings as a bridle, select identical sling constructions of identical length— with identical previous loading experience. Normal stretch must be the same for paired slings to avoid overloading individual legs and unbalancing the load during the lift.
Single-part hand-spliced slings must not be permitted to rotate when rigged in a straight, vertical hitch. Rotation can cause the splice to unlay and pull out, resulting in dropping of the load.
WARNING: Hand-spliced slings should not be used in lifts where the sling may rotate and cause the wire rope to unlay.
Anytime a load is lifted beyond arm’s reach with a single-part load line or straight eye-and-eye sling, use a tagline to prevent load rotation. If a wire rope is permitted to rotate, the strands may unlay and the rope’s capacity will be reduced.
Two basket hitches can be rigged with two slings to provide better balance for long loads. Be sure that slings cannot slide toward one another along the load when the lift is made.
Use an equalizing bar with double basket hitches to reduce tendency of slings to slide together, and to keep loads level. By adjusting the hook point and using a come-along or chain block to support the heavy end, the load can be kept level during the lift.
Proper Use of Cribbing
To turn or reposition a load, either one or two lifting devices may be employed. Always use a choker hitch or a single-leg direct attachment. Never attempt to turn a load with a basket, since the load will slide in the hitch, against the sling body—resulting in damage to both the sling and the load, and possibly a dropped load.
One Hook Load Turning
To turn a load with one hook, attach the sling directly to the load ABOVE the Center of Gravity. The lifting hook must be able to move, or travel, in the direction of the turn to prevent sliding of the pivot edge of the load just as the load leaves the ground. It may be necessary to lift the load clear to reposition it after the turn is completed, and irregular shapes sometimes will require blocking for support during and after the turn.
Two-hook turning is employed when it is desired to turn the load freely in the air. Main and auxiliary hoists of a crane can often be used, or two cranes can be used.
To turn from side (A) to (B) in 1 & 2 above, attach on side (B) above the Center of Gravity and on side (D) at the Center of Gravity, then lift both hoists equally until load is suspended. Lower auxiliary until turn is completed; detach sling at (B) before lowering load completely.
To turn from side (B) to (C) in 3 & 4 above, lift balanced load at (D) directly above the Center of Gravity; then attach auxiliary at (B) and lift to desired position. Lower both hooks simultaneously until side (C) is in desired position.
Turning with double choker gives good control, with weight always applied against a tight sling body and no movement between sling and load. To rig, place both eyes on top of load, pointing opposite direction of turn. Body of sling is then passed under load, through both eyes and over lifting hook. Blocking should be used under load to protect sling and facilitate removal.
Lifting unbalanced loads when exact length slings are not available can be accomplished by rigging a choke on the heavy end, as right. Length can be adjusted before weight applies, but once the load comes onto the sling, the hitch is locked in position for the lift.
Center of Gravity of a rectangular object with homogeneous characteristics will usually be below the junction of lines drawn diagonally from opposite corners. When a rectangular object has weight concentrated at one end, Center of Gravity will be situated toward that end—away from the intersection of diagonal lines. To avoid an unbalanced lift, the lifting hook must be rigged directly above the Center of Gravity.
To locate the approximate Center of Gravity of an irregularly shaped article, visualize it enclosed by a rectangle. Where diagonals from opposite corners intersect will usually provide a lift point near the Center of Gravity.
Overturning a heavy object onto cribbing, using one lifting hook and chainblock. To upend the object, chainblock “A” and the sling “B” should exchange positions.
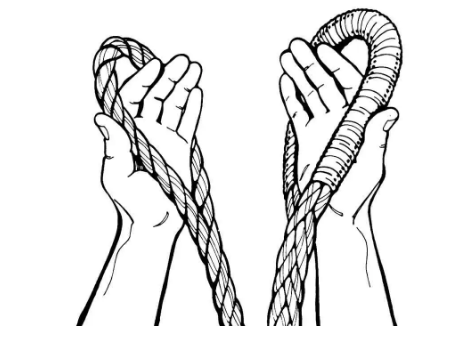
Doglegs, Sets and Kinks
When a loop is “pulled through,” it forms a kink which permanently deforms a wire rope by freezing or locking wires and strands. This prevents them from sliding and adjusting, and reduces rope strength.
A dogleg is a “set” which occurs when a wire rope sling is pulled down snug against a load. A dogleg usually can be “rolled back” or turned inside out, and usefulness of the sling restored, since strands can still adjust.
Eye deformation is ordinarily not detrimental to sling strength as long as there are no broken wires or gross distortion of the lay of strands. An eye has two legs, so has adequate strength for the load the body can carry. A sling should be retired when distortion locks the strands or flattens the rope in the eye so strands cannot move and adjust.
Rigger’s Check List
1. Analyze and Measure—Determine the total weight to be moved as well as exactly how far it is to move and how high it must be lifted.
2. Determine the Hitch—Decide how the load is to be connected to the lifting hook and how the sling will grip, or be attached to, the load.
3. Select the Sling—In addition to adequate Rated Capacity for the angles and hitch involved, the sling body should be of the type and style best suited to handling this specific load. Select a sling with proper end attachments or eye protection, as well as attachment hardware such as clevises.
4. Inspect the Sling—Make a good visual check of the sling you select to determine if it is in good condition and capable of making the lift. Refer to prevailing OSHA and ANSI regulations for inspection criteria.
5. Rig Up, Not Down—Always attach the sling to the load first, then attach it to the hook.
6. Check Everything—Before attempting a lift, take a light strain on the rigging, checking to see that blocking, sling and load protection and all safety devices are in place.
7. Stand Clear and Lift—Let the lifting device and rigging do the job—don’t use brute strength to prevent swinging or movement. Use a tagline, or tether, to control any movement. Keep all hands and toes out from under the load when it is suspended.
8. Don’t Jerk!—Lift slowly and with a steady application of power.
9. Put It Away!—After you’ve completed the job, check the sling for any damage (If it’s damaged, red tag it immediately or advise the sling inspector.), then return it to the sling storage rack for safekeeping until next usage.
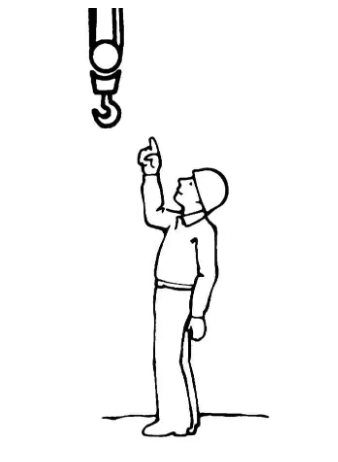
USA Standard Crane Hand Signals
Use Main Hoist. Tap fist on head; then use regular signals.
Use Whipline (Auxiliary Hoist). Tap elbow with one hand, then use regular signals.
Hoist. With forearm vertical, forefinger pointing up, move hand in small horizontal circle.
Lower Boom. Arm extended, fingers closed, thumb pointing downward.
Raise Boom. Arm extended, fingers closed, thumb pointing upward.
Lower. With arm extended downward, forefinger pointing down, move hand in small horizontal circles.
Raise the Boom and Lower the Load. With arm extended, thumb pointing up, flex fingers in and out as long as load movement is desired.
Lower the Boom and Raise the Load. With arm extended, thumb pointing down, flex fingers in and out as long as load movement is desired.
Travel. Arm extended forward, hand open and slightly raised, make pushing motion in direction of travel.
Swing. Arm extended, point with finger in direction of swing of boom.
Travel (One Track). Lock the track on side indicated by raised fist. Travel opposite track in direction indicated by circular motion of other fist, rotated vertically in front of body. (For crawler cranes only).
Travel (Both Tracks). Use both fists in front of body, making a circular motion about each other, indicating direction of travel; forward or backward. (For crawler cranes only.)
Extend Boom (Telescoping Booms). Both fists in front of body with thumbs pointing outward.
Retract Boom (Telescoping Booms). Both fists in front of body with thumbs pointing toward each other.
Extend Boom (Telescoping Boom). One Hand Signal. One fist in front of chest with thumb tapping chest.
Retract Boom (Telescoping Boom). One Hand Signal. One fist in front of chest, thumb pointing outward and heel of fist tapping chest.
Additional Signals for Bridge Cranes
Stop. Arm extended, palm down, hold position rigidly.
Emergency Stop. Arm extended, palm down, move hand rapidly right and left.
Move Slowly. Use one hand to give any motion signal and place other hand motionless in front of hand giving the motion signal. (Hoist slowly shown as example.)
Dog Everything. Clasp hands in front of body.
Bridge Travel. Arm extended forward, hand open and slightly raised, make pushing motion in direction of travel.
Trolley Travel. Palm up, fingers closed, thumb pointing in direction of motion, jerk hand horizontally.
Multiple Trolleys. Hold up one finger for block marked “1” and two fingers for block marked “2”. Regular signals follow.
Magnet is Disconnected. Crane Operator spreads both hands apart palms up.
Temperature, Lubrication & Moisture are Factors in Proper Storage
Care of Slings
The amount of care and proper maintenance a sling receives will go a long way in determining its service life. Following are guidelines which experience has shown helpful.
Storage: Proper storage requires that slings be kept in an area where they will not be exposed to water, extreme heat, or corrosive fumes, liquids, and sprays, of being run over or kinked.
Slings should never be left beneath loads or lying around where they may be damaged. All slings, when not in use, should be kept on a rack. Use of a rack minimizes accidental damage and allows easier monitoring of condition between regular inspections. A rack will also save time by allowing larger slings to be picked up and returned by crane, thereby reducing manhandling.
Effects of Temperature
All wire rope should be protected from extremes of temperature. The accepted rules are: Fiber core slings should never be exposed to temperature in excess of 200°F. Steel cored slings should never be used at temperatures above 400°F, or below minus 40°F.
It is not always easy to detect when wire rope has been damaged by heat. The most common visual signs are loss of lubrication and discoloration of wires.
The best practice to follow is that if there is the slightest suspicion that a sling was subjected to high temperatures, it should be taken out of service immediately. If it is absolutely necessary to use slings outside of the above temperature range, the sling manufacturer should be consulted.
Lubrication
Like any other machine, wire rope is thoroughly lubricated at time of manufacture. Normally, for sling use under ordinary conditions, no additional lubrication is required. However, if a sling is stored outside or in an environment which would cause corrosion, lubrication should be applied during the service life to prevent rusting or corroding.
If relubrication is indicated, the same type lubricant applied during manufacture should be used. Your sling manufacturer can provide information on the type of lubricant to be used and best method of application.